Welcome to my blog. I am a home stager and interior decorator based in Utah County. My blog focuses on projects I have created or am in the process of creating. One of my favorite things to do is give homes or objects new life. I used to dream of having a show on HGTV called Road Kill, because I like to pick up cast off objects on the side of the road and re-purpose /recycle them. Creating at www.stage7design.com
Sunday, April 28, 2013
Fun Cupboard
I used scrapbook paper to put a fun background in my glass fronted cabinet. Using modgepodge I modpodged this scrapbook paper to the inside backwall of the cabinet. , Although I like the result, I'm not in love with how this particular pattern looks on the inside and will probably redo it in a couple of years.
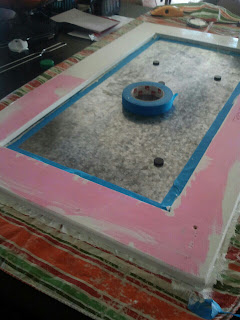
Using an old wooden frame take out the middle stuff :). Cut a piece of magnetic metal to fit the opening and use a glue gun or picture nails to secure it to the underside of the frame. Tape off your board ( or paint it before you put the metal in :)) and paint the outside. I used an interior latex paint I had around the house. Use sandpaper or a disk sander to distress the frame. Apply vynal decals to the board. My board says, "I am a Child of God, to remind my daughter of who she really is.
Wednesday, April 17, 2013
I felt like this very tall window needed very tall curtains, but very tall curtains are very expensive. I created these curtains out of three fabrics I had. I bought the fabric that lines the bottom panel and the thread. The Top fabric is a remnant of a Henredon Fabric http://www.henredon.com/ I purchased at a Henredon warehouse sale for $15 a Bolt. The middle fabric is the bottom of a curtain I had used in a previous home, the bottom portion is a gauzy linen curtain I had also previously used which was originally from Ross, http://www.rossstores.com/ , I cut it in half, sewed the halves together to make it wider and gathered it to create a soft flowing look at the bottom.
TIP: If you have a fabric you LOVE (a curtain, a tablecloth that was stained, etc...) don't toss it, tablecloths, etc...can be recycled into pillows, curtains, trims on your next design project.
I have always enjoyed the look of the old stepback cupboards but not the price, so I decided to create something similar on my own. I found the top piece of this cabinet at a garage sale. I found the bottom piece in the PennySaver http://www.pennysaverusa.com , It is an old bottom kitchen cabinet. I screwed both pieces together. I then took the doors off the bottom piece and painted the entire piece the same color. Once again I invaded my old knob collection and I found some large old glass knobs that I orginally found on http://www.ebay.com/ and used them to complete the project. The whole project cost me less than $100, way better than the $3000 dollar price tag on the cupboards I've admired at antique shops, and every item I used had a previous life. Even the paint, although not previously used, was left over from a previous project. :} The top portion has made an awesome storage area for unsitely media cases.
TIP: Old knobs can be used over and over again, if you find one that speaks to you...keep it and use it again somewhere else.
TIP: Old knobs can be used over and over again, if you find one that speaks to you...keep it and use it again somewhere else.
Labels:
DIY,
make your own stepback cupboard,
quilt cupboard
Subscribe to:
Comments (Atom)


